The repair bill that surprises cyclists most isn't a crash. It's a routine drivetrain service that spirals. A mechanic measures a chain that should have been replaced months ago. The cassette is scored. The chainrings are hooked. What should have been a $40 chain swap becomes a $400 to $700 replacement job — every tooth in the drivetrain worn out by one component that nobody was watching.
This is the chain-stretch domino effect. The chain wears first, then transfers that wear to every other surface it touches. By the time you feel the skip or hear the crunch, the cascade is already complete.
Understanding why this happens — and exactly when to intervene — is the difference between a $40 maintenance item and a bill that covers a long weekend away.
What "Chain Stretch" Actually Means
The term is a misnomer, but it stuck. Nothing in a bike chain is stretching. What's actually happening is pin-hole elongation: the steel pins and the inner plate holes they sit in are grinding down on every pedal stroke, removing microscopic amounts of metal from their contact surfaces.
A standard bike chain has 116 links. Each link has two pins. As each pin wears in its hole, it sits fractionally looser. Multiply that tiny amount of play across all 232 pin interfaces and the chain now measures longer than its nominal pitch.
Park Tool measures this elongation as a percentage over a 12-inch span. A chain at 0.5% wear has grown roughly 1/16 of an inch. That sounds trivial until you understand what a 0.5% change in pitch does to every cassette tooth it sits on.
ZFC's chain wear testing across hundreds of chain samples confirms that wear rate is primarily driven by lubrication quality and maintenance intervals — not the price of the chain. A $60 chain on a poorly maintained drivetrain wears at the same rate as a $15 chain. The physics doesn't care about your budget.
The Geometry of Damage
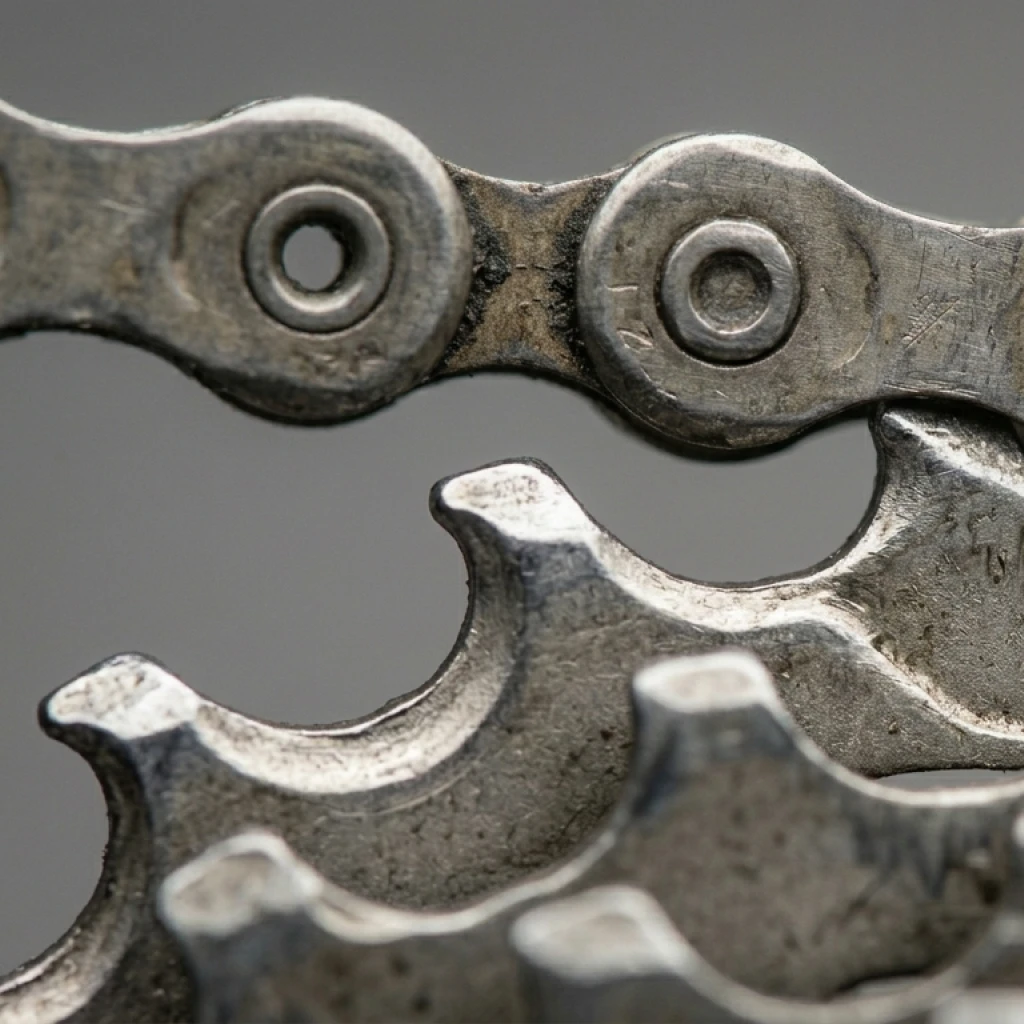
A cassette tooth is machined to exact dimensions. The tooth profile — the curve of the leading and trailing faces, the valley depth, the ramp geometry — is engineered to accept a chain link at a specific pitch. When that pitch changes, the contact geometry changes with it.
A worn chain at 0.5% elongation doesn't seat evenly across multiple teeth. Instead of distributing pedaling force across the full contact area of 3–5 teeth, it concentrates load on one or two tooth tips. Those tips, now carrying forces they weren't designed to bear, begin to erode. The soft alloy of the cassette — especially on mid-range aluminum sprockets — wears faster than the hardened chain steel doing the grinding.
Park Tool describes this directly:
"Since it's far more expensive to replace your cassette than it is to replace a chain, knowing when to replace your chain can actually save you some money in the long run." — Park Tool: When to Replace a Chain
This isn't advisory caution. It's a description of the failure mode. The cassette is the victim in this cascade; the chain is the cause.
The Domino Sequence
The cascade follows a predictable sequence, and each stage is more expensive than the last.
Stage 1 — Chain wear (0–0.5%) No audible symptoms. Shifting remains crisp. Chain measures within spec. A chain checker at 0.5% is the intervention point. Cost to fix: $30–$60 (chain only).
Stage 2 — Early cassette erosion (chain at 0.5–0.75%) Shifting begins to feel slightly imprecise on the most-used sprockets. No skipping yet. The cassette teeth are beginning to take asymmetric loads. Chain and cassette replacement at this point: $80–$200 depending on drivetrain tier.
Stage 3 — Active cassette damage (chain at 0.75–1.0%) Skipping under load on worn sprockets. The classic "ghost shift" when sprinting or climbing. Cassette teeth are visibly hooked when examined under light. A new chain dropped onto this cassette will skip immediately — the cassette is now incompatible with an unworn chain. Chain + cassette replacement required: $120–$500.
Stage 4 — Chainring involvement (chain past 1.0%) The same erosion process that destroyed the cassette has now been working on the chainrings. Replacement cost adds $60–$300 for chainrings alone. At this point, the full drivetrain replacement bill on a mid-range groupset (11-speed Shimano 105 or equivalent) routinely exceeds $400. On 12-speed Dura-Ace, SRAM Red, or Campagnolo Super Record, the bill can top $1,000.
The Real Cost Breakdown
| Scenario | What You Replace | Approximate Cost |
|---|---|---|
| Chain replaced at 0.5% wear | Chain only | $30–$60 |
| Chain replaced at 0.75% wear | Chain + cassette | $80–$200 |
| Chain replaced at 1.0% wear | Chain + cassette + possible chainrings | $150–$500 |
| Chain never measured (skip/skip on new chain) | Chain + cassette + chainrings | $300–$700+ |
These figures assume a mid-range drivetrain. Riders on premium components face multiplied stakes: a Shimano Dura-Ace R9200 12-speed cassette retails at $250–$400. A pair of SRAM Red eTap AXS chainrings runs $200–$350. The cost of a delayed $50 chain replacement scales with the value of the drivetrain it destroys.
How Fast Does Wear Progress?
ZFC's testing across real-world riding conditions gives the best data on chain lifespan by lubrication method:
| Lubrication Type | Chain Life to 0.5% Wear |
|---|---|
| Dry/neglected | 800–1,500 km |
| Wet lube | 1,500–2,500 km |
| Quality drip lube (regular) | 2,500–4,000 km |
| Wax (hot melt) | 4,000–8,000 km |
These ranges explain why two riders on identical equipment can have dramatically different maintenance intervals. The rider using hot-wax immersion treatment can go three to five times longer between chain replacements versus the rider using a wet lube in dirty conditions.
SILCA's friction research adds another dimension: a worn chain at 0.5% elongation is generating 5–10 additional watts of friction loss compared to a clean, correctly-lubricated new chain. That's a measurable performance penalty — the chain is wasting your power before it even starts damaging your cassette.
When a New Chain Won't Fix It
One of the most reliable diagnostic signals for cassette damage is this: a brand-new chain drops onto the cassette and skips immediately under load.
This happens because the cassette teeth have eroded to fit the worn pitch of the old chain. Their tooth profiles are no longer compatible with the standard pitch of an unworn chain. The new chain rocks in the worn valleys and kicks over the eroded tips.
If this describes your drivetrain, chain replacement alone will not solve the problem. The cassette must be replaced at the same time — and the chainrings should be checked. Swapping in a new chain without addressing the cassette is a common and expensive mistake.
The Wear Thresholds Worth Knowing
Higher-speed drivetrains tolerate less wear before the cascade begins:
| Drivetrain | Replace Chain At | Source |
|---|---|---|
| 12-speed Shimano | 0.5% | Shimano / Park Tool |
| 12-speed SRAM Eagle / AXS | 0.8% | SRAM |
| 11-speed | 0.5% | Park Tool |
| 10-speed | 0.75% | Park Tool |
| 9-speed and below | 0.75% | Park Tool |
The tighter tolerances of 12-speed drivetrains are why an earlier replacement threshold is mandatory. A 12-speed chain at 0.75% wear has already done meaningful damage to the cassette. The pitch precision required by narrow 12-speed chains leaves no margin.
A $15 chain wear indicator (Park Tool CC-4, CC-2, or equivalent) is the cheapest tool in cycling. It takes 30 seconds to use and makes the measurement objective. There is no reason to guess.
Stopping the Cascade Before It Starts
The domino effect only happens because the chain wear is invisible during normal riding. There are no warning sounds, no shifting anomalies, and no performance degradation in the early stages — the interval where intervention is cheapest. By the time symptoms appear, you are already in Stage 3 or Stage 4.
The solution is scheduled measurement rather than symptom-based response. Check chain wear every 300 to 500 km, or after every 5 to 8 rides. The check takes less than a minute. The cost of the tool is recovered on the first chain replacement it enables.
A $15 chain wear indicator (Park Tool CC-4, CC-2, or equivalent) is the cheapest tool in cycling. It takes 30 seconds to use and makes the measurement objective. There is no reason to guess.
Your drivetrain does not have to fail on a schedule. The chain-stretch domino effect is entirely preventable with accurate mileage tracking and a $15 tool. The expensive repairs are not inevitable. They are what happens when you wait for symptoms instead of watching the numbers.
How Componentry Fits Into Your Care Routine
The fundamental problem with manual chain tracking is that the intervention window is invisible. No sounds, no sensations, no visual cues. You need a system that counts kilometers automatically and applies the correct wear threshold for your specific drivetrain.
Componentry connects to your Strava, Garmin, or Wahoo account and automatically logs every ride's distance to each component on the relevant bike. Your chain mileage updates after every activity sync without manual entry.
You configure the alert threshold for your exact setup. A 12-speed Dura-Ace drivetrain gets a tighter threshold than a 10-speed training bike. When accumulated mileage approaches the replacement interval, Componentry sends an alert before the measurement becomes critical. Not after the cassette is already scored.
For multi-bike households, each bike's chain is tracked independently. The race bike that accumulates 300 km/week and the weekend gravel bike that does 80 km/week are on their own schedules. No spreadsheet. No mental calendar. No discovering a worn chain when you drop a new one on and it skips.
The domino effect is a $400 to $700 problem with a $40 solution. Componentry ensures the $40 solution happens on time.
Recommended Videos & Further Reading
Measurement and Diagnosis:
- Park Tool: When to Replace a Chain — Chain checker usage, wear thresholds, and replacement decision framework
- Park Tool: Chain Wear Video Guide — Visual walkthrough of chain measurement with CC-4 tool
Chain Wear Testing Data:
- Zero Friction Cycling: Chain Life Test — Independent testing of chain lifespan across lubrication methods and conditions
- SILCA: The Science of Chain Efficiency — Friction loss data and the watt cost of worn chains
Componentry Resources:
- When to Replace Your Bike Chain: The Complete Guide — Exact wear thresholds, measurement methods, and cost comparisons by drivetrain speed
- The Friction Tax: How Drivetrain Efficiency Costs You Watts — The performance penalty of riding a worn chain
- Drivetrain Efficiency: Why Cassette Precision Matters — The physics behind why high-end cassettes demand tighter wear tolerances